Alert Object
This section describes the purpose of the Alert object and its properties. Below you will find a general overview, followed by a detailed description of Alert Properties as they appear in the various alert categories (tabs).
Alerts are used to notify ActiveBatch users than an ActiveBatch alertable condition has occurred. For example, a Job has failed, a Queue is offline, or a Plan has breached its service level agreement (SLA).
A Job, Plan or Queue can have one or more alerts and each alert can have one or more actions. An Alert object is a container or collection of alerts. The advantage of an Alert object is that you can associate the object to one or more event generating objects (Job, Plan and Queue). While you may have several alert types configured in a single Alert, the alert is only acted upon when the alertable condition occurs.
Note: The Job Scheduler object supports alerts as well (see the Alerts property sheet of the Job Scheduler). Scheduler alerts are embedded and do not use Alert object association.
Alert objects support referencing ActiveBatch constant and active variables in alert properties that you would typically enter a string value (you can enter a variable instead - e.g. ${MyVar}). The Scheduler resolves variables by accessing the object that the alert is associated with. For example, if JobA is associated with an Alert object, and JobA causes the alert to go out, the variable used in one or more alert properties would be resolved by looking for the variable definition starting with JobA's Submission Queue, then its User Account, then locally on JobA, and lastly it looks up the full path of JobA. It starts with JobA's parent container, then goes all the way up to the Scheduler root, if necessary. Please note that as soon the Scheduler finds a matching variable name, the system stops looking. For example, if ${MyVar} is referenced on the Alert object, and the variable is defined on JobA's parent Plan, when the system finds the definition there, it stops looking up the full path. For more details about variables and how they are resolved, see the ActiveBatch Variables section of the documentation.
To create an Alert, right-click on the desired container (Scheduler root, existing Folder or Plan) in the Object Navigation Pane, select New, then select Alert. When you’ve completed the Alert settings, you must click the Save or the Save and Close button to save the Alert. Click the X on the tab of the New Alert if you wish to cancel the creation of the Alert. When you save the Alert, it will instantly appear in the Object Navigation pane (if auto refresh is enabled). To modify an existing Alert, right-click on the Alert in the Object Navigation pane, then select Properties.
Note: Alert-Triggers only activate downstream job or plans once per batch run. Restarting a Plan restarts all job/plan instances and triggers alerts/completions anew; restarting a Job only reruns that job and triggers alerts if not previously run.
General
The image below depicts the General category of an Alert object.
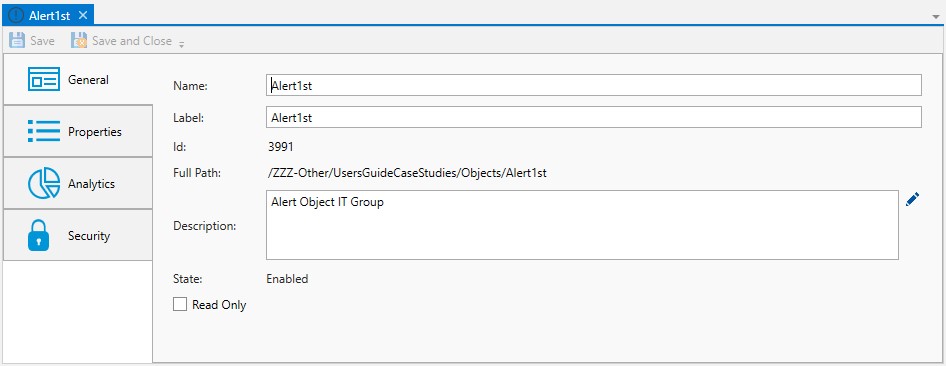
Name: This mandatory property represents the name of the object. The name is limited to 128 characters. The object’s name should be unique to avoid confusion. We recommend that it also be somewhat descriptive so it’s easy to find. The name is used (by default) to identify the object in the Object Navigation pane and other places in the UI. This can be changed to the label, if desired. See "Display Mode" in the General Settings
Label: Every object must be uniquely labeled within the scope of the namespace. The label is limited to sixty-four (64) characters. The label is typically the same value as the name (it is auto-filled to match the name you enter); however, uniqueness is always enforced for an object’s label. The label is recorded in the ActiveBatch namespace. The characters that may be used for the label property are restricted to alphanumeric (A-Z, a-z, 0-9), space, period (.), dash (-) and underscore (_). The label itself must begin with an alphabetic character. The label is typically used when scripting. All searches are case-insensitive. ActiveBatch does allow you to search for objects using either the label or the name properties.
ID: This is a unique read-only number that can be used to retrieve the object. Is it assigned by the system when a new object is saved.
Full Path: This read-only property provides the full namespace specification of the object. It consists of the container(s) the object has been placed in, with the object’s label appended to the end. For example, the fullpath: /IT Jobs/Nightly Run/<object label>, is such that IT Jobs is a root-level Folder, Nightly Run is a Plan, followed by the label of the object you are creating.
Description: This free form property is provided so you can document and describe the object to others. The description is limited to 512 characters. Clicking on the pencil icon will pull up a mini text editor where you can more easily enter your description.
State: This property indicates whether the object is enabled or disabled for use.
Read Only: This checkbox, when enabled, means the Alert properties cannot be changed. You must have “Modify” access permission to the Alert object to set this feature. To clear the read-only attribute, uncheck the box.
The Properties tab is the key property sheet where you configure the Alert object.
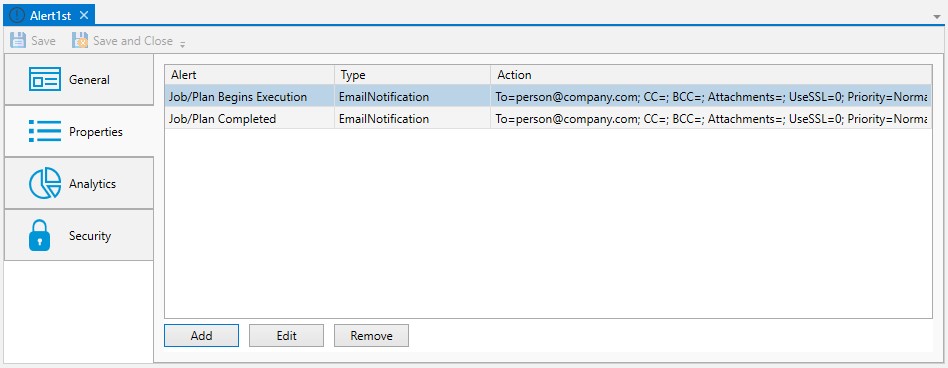
The above image depicts two alerts that have been added to the Alert object. This includes Job/Plan Begins Execution, and Job/Plan Completed. Once the Alert is saved, the next step is to associate the Alert object to as many Jobs and Plans as you would like to receive these alerts for. When the "Begin Execution" and "Completed" events occur, the action is to send an email (there after a variety of actions to select from, where email is most popular).
There are many Plan, Job and Queue related alerts. The action to take when the alertable condition occurs is to either select a notification method, or trigger another Job or Plan (see the Notification and Job Trigger properties in the image below).
Click the Add button to add a new Alert Type to the list. You will be presented with a dialog similar to the one depicted in the image below.
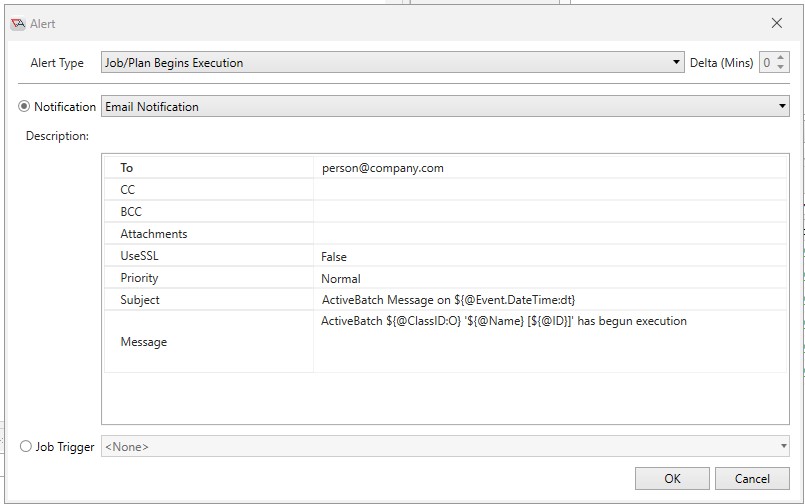
Select the Alert Type, and Notification Type, or Job to trigger. Configure the properties associated with your selection. Click OK to confirm and add the alert. Click Cancel to cancel the operation.
Below are Job and Plan alert types.
Alert Description Job Delayed in Starting
The Job/Plan was delayed in starting on-time.
Job/Plan Aborted
The Job/Plan was aborted by manual intervention.
Job/Plan Begin Execution
The Job/Plan is beginning execution.
Job/Plan Completed
The Job/Plan completed.
Job/Plan Completed in Failure
The Job/Plan completed in failure.
Job/Plan Completed in Success
The Job/Plan completed in success.
Job/Plan Constraint Failure
The Job/Plan suffered a constraint failure.
Job/Plan Constraint Wait (Delta)
The Job/Plan suffered a constraint wait. This alert can be set for a delay from the alert condition being met to the alert being issued.
Job/Plan CPU Time Overrun
The Job/Plan has exceeded its expected CPU time.
Job/ Plan CPU Time Underrun
The Job/Plan has underrun its expected CPU time.
Job/Plan Elapsed Time Overrun
The Job/Plan has exceeded its expected elapsed time.
Job/Plan Elapsed Time Underrun
The Job/Plan has underrun its expected elapsed time.
Job/Plan Dispatch Time
The Job/Plan instance was not executed as it exceeded its maximum dispatch time.
Job/Plan Held
The Job/Plan was held from execution.
Job/Plan Instance Modified
A Job/Plan instance (actually the definition) has been modified.
Job/Plan Instance Skipped
A Job/Plan instance was skipped over from executing due to concurrency limitations.
Job/Plan Logon Error
The Job/Plan failed due to a logon error.
Job/Plan Missed Expected Trigger
The Job/Plan was not instantiated during an expected date/time period. This alert concerns an event Plan/Job that was expected to execute during a date/time period.
Job/ Plan On Trigger
The Job/Plan has been triggered for execution.
Job/Plan Pending Execution
The Job/Plan is now pending execution.
Job/Plan Released
The Job/Plan is released from a hold.
Job/Plan Restart Postponed
The Job/Plan is to be restarted and is waiting.
Job/Plan Restarted
The Job/Plan has been restarted.
Job/ Plan State Transition: Failed to Success
The Job/Plan had originally failed but ultimately was restarted and completed successfully.
Job/ Plan Trigger Failure
The Job/Plan failed to start by trigger.
Object Modified
An ActiveBatch object or definition (not an instance) has been modified.
SLA Batch Completed in Error
An SLA marked Job/Plan completed in error.
SLA Batch is Aborted
An SLA marked Job/Plan was aborted.
SLA Breached
An SLA marked Job/Plan exceeded its Relative Duration or missed its Deadline time. The Job is still executing.
SLA in Critical Zone
An SLA marked Job/Plan has entered the Critical Zone of remaining time.
SLA in Warning Zone
An SLA marked Job/Plan has entered the Warning Zone of remaining time.
SLA Started
An SLA marked Job/Plan has started.
SLA Successful
An SLA marked Job/Plan has completed successfully and has met its SLA deadlines.
Below are Queue alert types.
Alert Description Object Modified
Object Definition has been modified.
Queue Starting
Queue is starting.
Queue Started
Queue has started (and is operational).
Queue Stopped
Queue has stopped.
Queue Connected
Queue is connected to Execution Agent.
Queue Disconnected
Queue is disconnected from Execution Agent.
Queue Closed
Queue is closed.
Queue Opened
Queue is opened.
Job Scheduler alerts are embedded on the Job Scheduler object (and are not available via the Alert object). To view alerts associated with the Job Scheduler, see Alerts
Two Alert object (2) action categories are possible: Notification or Trigger.
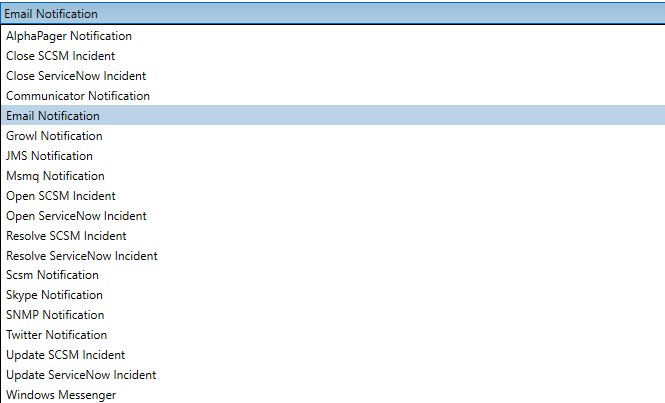
Below you will find a list of alert notifications. These are the ways in which you can notify interested parties that an alertable condition has occurred in ActiveBatch.
Several Notification methods include some fields that are preset based on the Alert Type selected. For example, if you select Alert Type "SLA Successful" using Notification "Email", some fields such as the subject and message are pre-poulated to include the object name and ID related to the alert (using built-in ActiveBatch variables) - and what happened (i.e. Batch met its SLA successfully). Whenever you see preset values, you can keep them or make changes as desired.
ActiveBatch Alert: Generate an ActiveBatch Alert that is added to the Alerts Pane.
Context Mode: This dropdown indicates whether the alert is applicable to the Instance or Definition.
Description: This property contains the actual message for the alert.
Priority: This dropdown indicates the priority of the alert (High or Normal).
ActiveBatch Event Log: Generate an Event Log entry to the ActiveBatch Event Source.
Location: A choice of selection; Job Scheduler, Execution Agent, Client or Custom.
MachineName: The name of the machine that will contain the event log entry .
Message: The message text itself.
AlphaPager(SMTP): Generate an AlphaPager alert
Note: AlphaPager E-Mail is limited to 150 characters (all parts of the E-Mail).
To: This property (and CC, BCC) indicates the destination EMail recipient. This must be entered as an acceptable E-Mail address. Multiple E-Mail addresses may be separated by a semi colon. A special prefix may also be inserted for special formatting requirements.
Subject: This is the subject of the alert. By default, ActiveBatch will display the default subject line for this type of alert.
Message: This is the body of the message. By default, ActiveBatch will display the default body that will appear for this type of alert.
Communicator Notification: Generate a message using Microsoft Office Communicator.
To: This property represents the destination addresses (user@domain syntax). One or more may be specified comma separated.
OCS Server: This property is the Office Communicator hostname.
Transport Type: This property represents the security transport to use.
Message: This property is the message to be sent.
Credentials: This optional property is a Username Account object that contains appropriate security credentials for sending the message.
Domain: This optional property is a domain for the OCS Server system. If omitted, the local domain is used.
E-Mail (SMTP): This generates a general purpose E-Mail.
To: This property indicates the destination E-Mail recipient (so do the CC and BCC fields). These fields must be entered as acceptable E-Mail addresses. Multiple E-Mail addresses may be separated by a semi colon. A special prefix may also be inserted for special formatting requirements.
Subject: This property is the subject of the alert. By default, ActiveBatch will display the default subject line for this type of alert.
Message: This property is the body of the message. By default, ActiveBatch will display the default body that will appear for this type of alert.
Attachments: This property indicates the file(s) that are to be sent with this alert message as an attachment.
UseSSL: This property indicates if SSL email is being used. Set the field to true or false.
Priority - This property allows you to set an email priority of Normal, Low or High.
Event Log: Add the alert to the Windows Event Log.
Location: This dropdown lists the acceptable Windows Event Log machines. One of the following: Job Scheduler machine, Client and Execution Machine or you may indicate a custom location.
Machine: If you entered Custom you would specify the machine in this property.
Growl Notification: Generate a message to the Growl Notification system.
Display Name: This property is the notification name.
Title: This property is the title of the notification.
Message: This property is the message body of the notification. Advanced Properties: This collection of properties controls the characteristics of how Growl handles the notification. In addition, the Growl hostname must be supplied.
Growl Security: This property is a User Account object that contains security credentials necessary to permit proper access to the specified Growl server.
JMS Notification: Generate a JMS notification.
JMS Provider Info: This set of properties specifies the location of the JMS server and how a connection can be made. A dropdown is available to select from popular JMS servers. In addition, a “Custom” setting is available for you to enter your own JMS server if not already listed.
JNDI Connection Factory Name: This property concerns the JNDI name of a Connection Factory object. A ConnectionFactory object encapsulates a set of connection configuration parameters that has been defined by an administrator.
JNDI Destination Queue Name: This property concerns the destination Queue name for the JMS message to be sent. This destination object can be a Queue or a topic.
Credentials: This property, if specified, represents a User Account object with security credentials that are appropriate for authentication with your JMS provider. The username and password are sent to authenticate.
Message Text: This property represents the message body for the JMS message.
Message Property: This collection of optional properties concerns “headers” or properties for the JMS message. Clicking the “Add” button allows you to add a property. Clicking the “Delete All” button allows you to delete all the properties. Each property consists of a datatype, name and associated value.
Messenger: Generate a Windows Messenger service message.
Machine: A machine-name (or machine\username) that is acceptable to the Windows Messenger service.
Message: The message to be sent.
MSMQ Notification: Generate a Microsoft Message Queue notification.
Machine Name: This property represents the MSMQ Server.
MessageQueueName: This property indicates the destination queue-name for the message.
MessageText: This property contains the message body of the notification.
Journal: This Boolean property indicates whether the message should be journaled.
Recoverable: This Boolean property indicates whether the message should be recoverable.
Twitter Notification: Generate a message to Twitter.
Credentials: This property represents a User Account object that contains Twitter Authentication information.
Message: This property represents the message body of the notification (or tweet).
SCSM Notification (legacy): Generate a message to the System Center Service Manager system.
Server Name: This property represents the hostname of the server in which SCSM resides.
Incident Information: This collection of properties pertains to describing and categorizing the incident.
Assigned to: This property indicates who the incident is to be assigned to.
Affected User: This property indicates the affected user.
This next class of Alert actions constitutes what we refer to as “Compensating Alert Actions”. While all of the previous actions were stand-alone, meaning that when issued no special prior context was required, this class indicates a specific order of actions. This is useful when something changes and you want to modify a previous alert action issued. For example, a failed Job instance was restarted and is now successful. Now that it’s successful you might want to close or resolve the opened incident to note the change.
Currently, ActiveBatch currently supports one (1) class of compensation alert actions: Incidents. The Incident System currently supports Microsoft System Center Service Manager.
OpenIncident: Open an incident with the System Center Service Manager system.
Please note that if the incident already exists, a comment that indicates that it has “reoccurred” will be placed into the incident. If the incident has already been resolved; it will be re-opened.
Title: This property is the title of the incident.
Description: This property is a description of the incident.
Provider Info: This collection of properties is Provider specific.
System Center Service Manager:
Server Name: This property represents the hostname of the server in which SCSM resides.
Incident Info: This collection of properties pertains to describing and categorizing the incident.
Assigned to: This property indicates who the incident is to be assigned to.
Affected User: This property indicates the affected user.
Files to Attach: This property allows one or more files to be attached to the created incident.
Attaching User: This property represents the files attaching user.
Log Entry: This pair of properties allows you to associate an additional comment.
UpdateIncident: Update an existing incident with the System Center Service Manager system.
System Center Service Manager:
Server Name: This property represents the hostname of the server in which SCSM resides.
Incident Info: This collection of properties pertains to describing and categorizing the incident.
Assigned to: This property indicates who the incident is to be assigned to.
Affected User: This property indicates the affected user.
Files to Attach: This property allows one or more files to be attached to the created incident.
Attaching User: This property represents the files attaching user.
Log Entry: This pair of properties allows you to associate an additional comment.
ResolveIncident: Resolve an existing incident with the System Center Service Manager system.
System Center Service Manager:
Server Name: This property represents the hostname of the server in which SCSM resides.
Log Entry: This pair of properties allows you to associate an additional comment.
CloseIncident: Close an existing incident with the System Center Service Manager system.
System Center Service Manager:
Server Name: This property represents the hostname of the server in which SCSM resides.
Log Entry: This pair of properties allows you to associate an additional comment.
SNMP: Generate an SNMP trap when this alert occurs.
Destination: This field indicates the TCP/IP Hostname or IP address that is the target of the trap. The default of 255.255.255.255 broadcasts the trap to any listening SNMP agents. Multiple trap manager addresses by be specified using a semi-colon
Job Trigger
This dropdown lists all Plans and Jobs that can be triggered should this alert occur.
Selecting one will cause a Trigger and Change Parameters operation to occur. Two formal parameters are passed to the Job: JobID of the Job that was the target of the alert and the alert number. Note: You must have “Trigger and Change Parameters” access permission and the Job's Submission Queue property cannot be the built-in OnDemand Queue. If the Job already has parameters they will be overwritten for this instance.
An alert trigger is one way in which instances are tied together using the same Batch Run ID. See View Batch Run for more details.
The Analytics properties are depicted in the image below. This section details any changes made to the Alert object, and provides you access to the object's revision history.
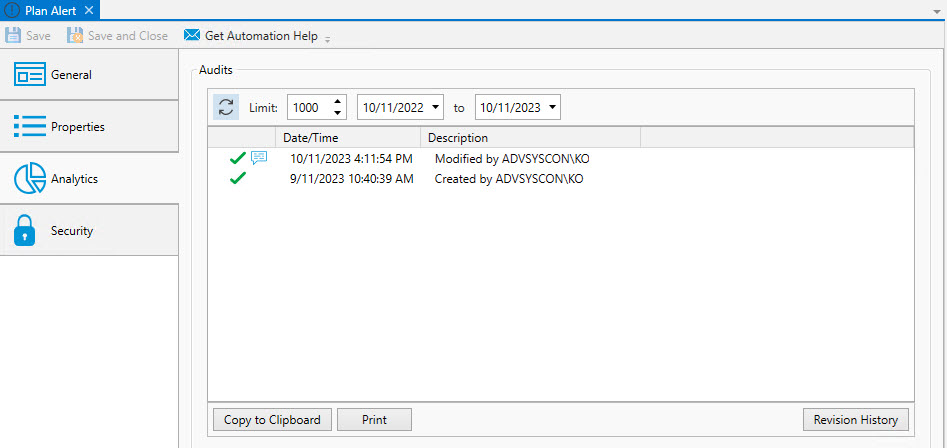
The Audits panel includes controls that allow you to filter the audits based on start and end dates. You can also limit the audits retrieved to a maximum number. The refresh button allows you to retrieve any audits that were generated after this dialog was initially displayed.
Each audit is contained in a single line in date and time sequence. Audits are read-only and cannot be modified. An icon appears at the beginning of each audit to help visually signal the severity of the audit. If an audit policy
Opening an audit item (by double-clicking on the item), depending on the nature of the audit, will sometimes reveal additional information concerning the audit.
The Copy to Clipboard button copies the contents of the retrieved audits into a copy buffer that you can later paste into a document or other program.
The Print button allows you to print the retrieved audits.
The Revision History button allows you to select one or more audits concerning changes made to an object and perform a difference operation between the selected revised objects.
This tab is where object security is configured. Security in ActiveBatch mirrors how security is granted using Windows security. That is, permissions applicable to the object (Read, Write, Modify, Delete, etc.) are Allowed or Denied for the Active Directory users and/or groups assigned to the object.
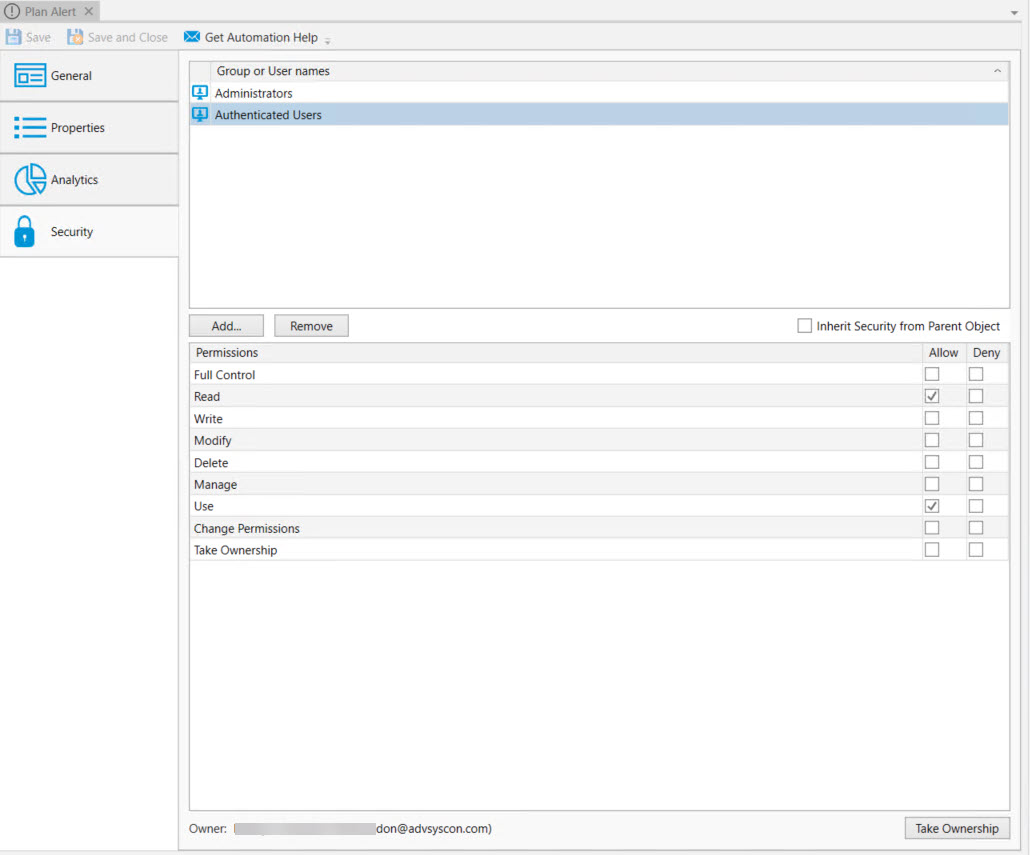
When new objects are created, they will either be assigned factory default
When a default policy has been used to preset object security, the new object will either have:
The Inherit Security from Parent Object property checked (it is not checked by default). When checked, the listed users and/or groups along with their permissions granted will be read-only. The Add and Remove buttons will be disabled because security is being inherited from the object's parent container. When Inherit Security from Parent Object is checked, it is likely the ActiveBatch Administrator will be setting up security on parent container(s), and the Job author will not have to modify anything about security. This would require a larger discussion with an ActiveBatch Administrator who it typically tasked to manage object security, since there are options.
The Inherit security from Parent Object property is not checked. The users and/or groups are listed along with their permissions granted, but there is likely some differences when compared to the factory default security, since the purpose of setting a default policy for security is to add Active Directory groups and/or users (and their access permissions) that are specific to your organization. Since Inherit Security is not checked, the Add and Remove buttons will be enabled. When this is the case, Job authors will need to be advised if there needs to be any changes made to security when they create new objects.
As a best practice, it is best for an ActiveBatch Administrator to preset security using a default policy (for all object types) so Job authors do not have to manage security, which can be time consuming and error-prone. See the ActiveBatch Installation and Administrator's Guide for more best practice information regarding object security.
Below is a list of permissions related to this object.
Access Description Read
User is allowed to read the object.
Write
User is allowed to write the object.
Modify
User is allowed to modify the object (Read + Write)
Delete
User is allowed to delete the object.
Use
Account is allowed to use the object.
Manage
Account is allowed to perform Enable/Disable operations.
Take Ownership
User is allowed to take ownership.
Change Permissions
User is allowed to change permissions for the object.
Full Control
All of the above access is enabled.
The owner of an object is always granted Full Control by the system, and their permissions cannot be changed or reduced. If another user takes ownership, then the original owner's access will depend on how security is set up (if they are a user or group that has been given access). The new owner will automatically be granted Full Control, and once again, their permissions cannot be changed or reduced.
To take ownership, you will need to be granted the Take Ownership permission. Click the Take Ownership button and confirm the action. Another way to take ownership is to right-click on the object in the Object Navigation pane, then select Advanced > Take Ownership.
To modify security, you need "Change Permissions" security granted.
The Deny permission is generally used for users who have been granted access based on a group membership, but there is a need to override this for a particular user. Deny takes precedence over Allow.
Below you will find the instructions on how to modify security when Inherit Security from Parent Object is not checked.
To edit an existing account, select the listed user or group, then change the permission using the Permissions list box (Allow or Deny access).
To remove an existing account name, select the listed user or group and click the Remove button.
To add a new user or group, click the Add button and follow the dialog as depicted in the image below.
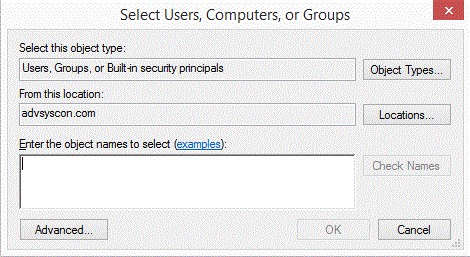
The dialog is similar to that of other Windows objects, and leverages Active Directory services. The Locations button allows you to select either the Job Scheduler machine or any applicable domain. Clicking the Advanced button allows you to search for specific users and/or groups. Alternatively, you may enter object names (a user or group) in the large edit box. Clicking the Check Names button allows you to validate the accounts. Click the OK button to add the selected Account to the object’s security list.